Mastering WordPress Admin Customization: A White-Label Guide
Delivering a generic, unconfigured WordPress dashboard to a client is like handing over the keys of an aircraft to someone who only needs to drive a car. The default administration area contains developer-facing options (such as Settings, Tools, and Plugins) that confuse non-technical users, increase the risk of accidental site breakages, and trigger unnecessary support tickets. Customizing the admin panel resolves these issues, streamlining content workflows while reinforcing your agency’s brand identity. This guide provides a developer’s blueprint for customizing menus, configuring settings pages, customizing toolbars, and hardening user access controls.
Learn more about our professional WordPress development services to build custom admin architectures.
Applying these dashboard customization strategies requires a systematic approach that balances developer access controls with client usability. Here is how to execute each strategy effectively.
1. Security and Capability Mapping: Controlling Real Access
A common error when customizing the admin panel is relying solely on remove_menu_page() to restrict access. However, this function only hides the links from the sidebar menu. If a user types the direct URL into their browser address bar (e.g., wp-admin/options-general.php), they can still modify settings if they have the manage_options capability.
To secure your site, you should register a custom user role with specific primitive capabilities.
Creating a Secure Custom Role
Add this script to your theme’s functions.php file to register a tailored role for client managers:
declare(strict_types=1);

namespace WPPoland\Access\Roles;

/**
 * Registers a restricted user role for client managers.
 */
function register_client_manager_role(): void {
    // Remove the role first to allow updating capabilities during development
    remove_role( 'client_manager' );

    add_role(
        'client_manager',
        'Client Manager',
        [
            'read'                   => true,
            'edit_posts'             => true,
            'publish_posts'          => true,
            'delete_posts'           => true,
            'edit_pages'             => true,
            'publish_pages'          => true,
            'edit_others_pages'      => true,
            'upload_files'           => true,
            'manage_categories'      => true,
            'moderate_comments'      => true,
            'manage_options'         => false, // Block access to settings
            'install_plugins'        => false, // Block plugin installation
            'update_core'            => false, // Block core updates
            'edit_theme_options'     => false  // Block theme settings access
        ]
    );
}
add_action( 'init', __NAMESPACE__ . '\\register_client_manager_role' );Hooking into map_meta_cap to Enforce Page-Level Constraints
For fine-grained capability checks, you can intercept user requests at runtime using the map_meta_cap hook. For example, if you want to block client managers from editing the site’s critical frontpage post:
declare(strict_types=1);

namespace WPPoland\Access\CapFilters;

/**
 * Prevents non-administrators from editing the homepage.
 */
function protect_frontpage_capability( array $caps, string $cap, int $user_id, array $args ): array {
    // If the capability checked is edit_post, evaluate post eligibility
    if ( 'edit_post' === $cap && ! empty( $args ) ) {
        $post_id    = (int) $args[0];
        $front_page = (int) get_option( 'page_on_front' );

        // Target the frontpage specifically
        if ( $post_id === $front_page && ! user_can( $user_id, 'manage_options' ) ) {
            $caps[] = 'do_not_allow'; // Force cap evaluation failure
        }
    }
    return $caps;
}
add_filter( 'map_meta_cap', __NAMESPACE__ . '\\protect_frontpage_capability', 10, 4 );2. Streamlining the Sidebar Menus
Once correct capabilities are configured, use clean visual filtering hooks to remove unused menu items and simplify the editor’s workspace.
Implementing Menu Filters
declare(strict_types=1);

namespace WPPoland\Admin\Menu;

/**
 * Filters the admin sidebar menu to clean up user views.
 */
function clean_sidebar_menu_pages(): void {
    // Keep menus accessible to full administrators only
    if ( current_user_can( 'manage_options' ) ) {
        return;
    }

    // Remove primary administrative menus
    remove_menu_page( 'tools.php' );                  // Tools
    remove_menu_page( 'options-general.php' );         // General Settings
    remove_menu_page( 'edit-comments.php' );           // Comments
    remove_menu_page( 'plugins.php' );                 // Plugins
    remove_menu_page( 'themes.php' );                  // Appearance / Customizer

    // Remove specific submenu pages under Posts
    remove_submenu_page( 'edit.php', 'edit-tags.php?taxonomy=post_tag' ); // Tags
}
add_action( 'admin_menu', __NAMESPACE__ . '\\clean_sidebar_menu_pages', 999 );3. Creating Custom Dashboard Widgets
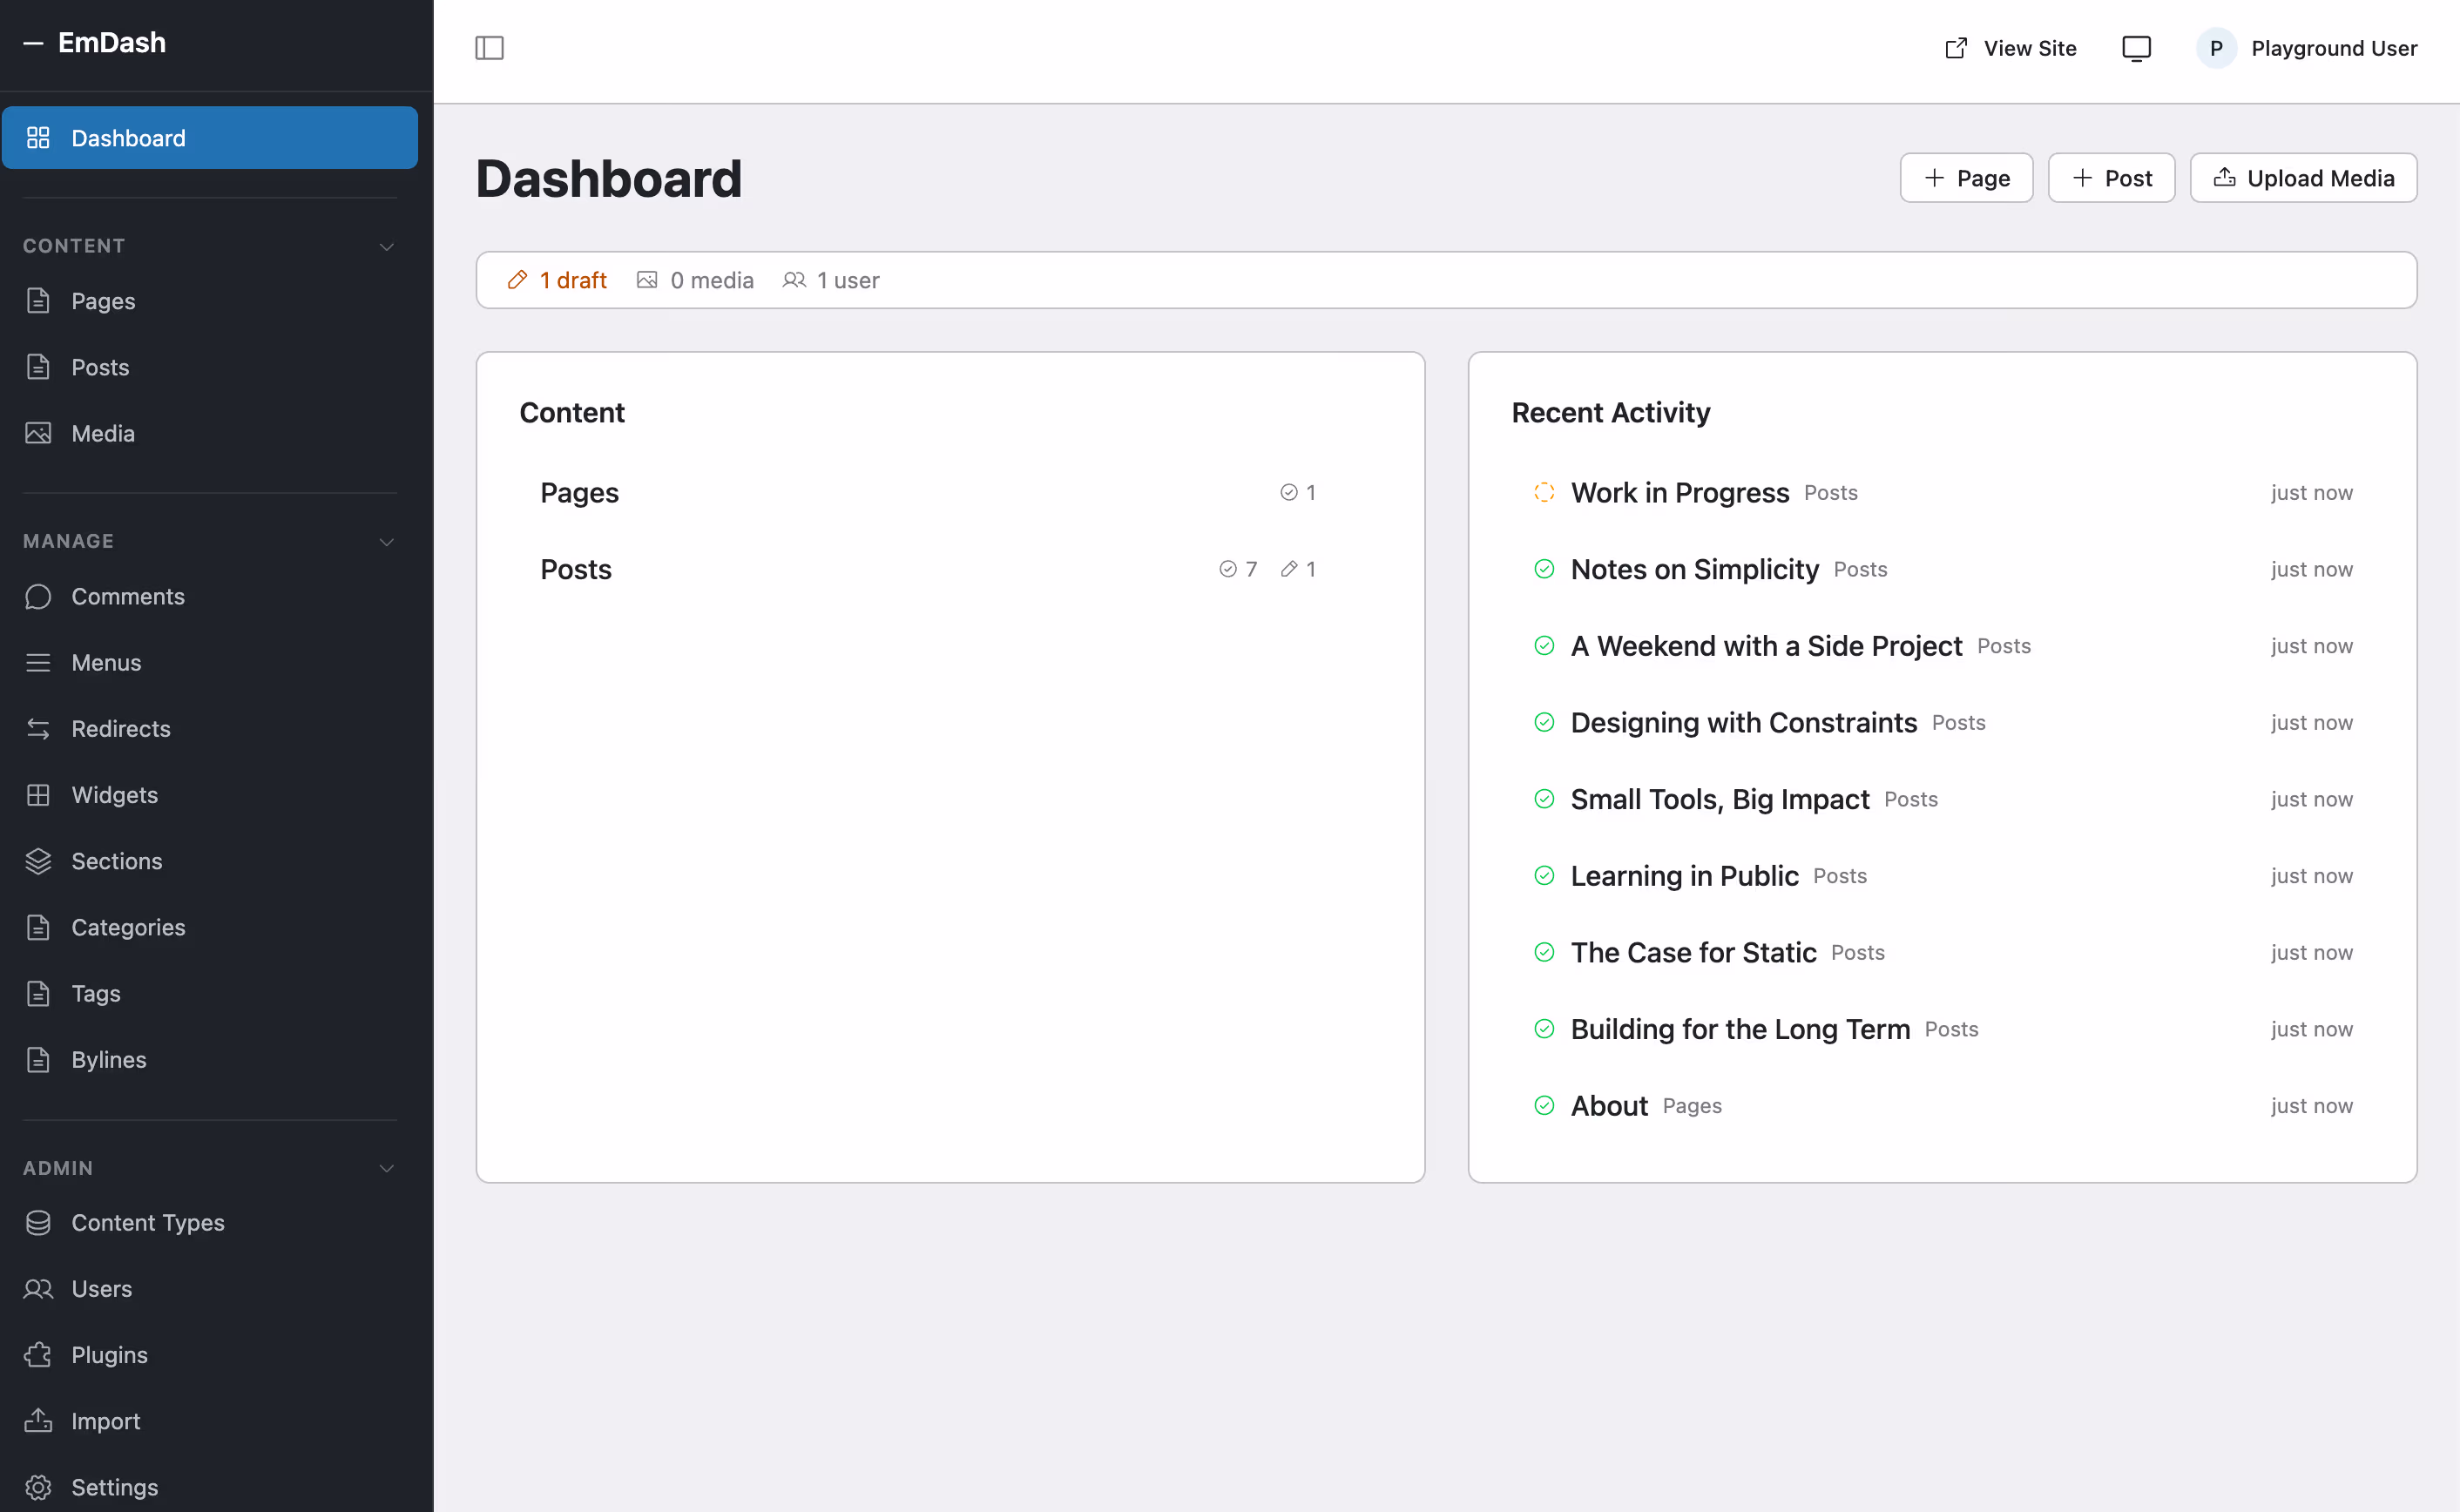
The default WordPress dashboard displays widgets like “Quick Draft” and “WordPress Events and News,” which are irrelevant to most business owners. Replacing these with custom support widgets makes the dashboard more functional for your clients.
Optimizing Dashboard Loading Speed and Removing Remote Feed Bloat
By default, the core dashboard widgets execute several background checks that delay load times:
- External RSS Feed Retrieval: The “WordPress Events and News” widget queries external blogs. If DNS resolution is slow or the target servers have high latency, the dashboard page can freeze for several seconds until the PHP process times out.
- Site Health Diagnostics: The Site Health widget runs active directory scans and background queries on every page refresh, placing unnecessary stress on the database engine.
- Database Write Queries: The “Quick Draft” widget initializes draft post objects in
wp_posts, creating orphaned rows that bloat the database options table. - Removing these widgets via
remove_meta_box()during thewp_dashboard_setupaction prevents these background processes from executing, reducing dashboard initial rendering times by up to 50%.
Implementing a Custom Telemetry and Support Widget
declare(strict_types=1);

namespace WPPoland\Admin\Dashboard;

/**
 * Removes default widgets and registers custom support widgets.
 */
function rebuild_dashboard_widgets(): void {
    // Remove default dashboard panels
    remove_meta_box( 'dashboard_quick_press', 'dashboard', 'side' );
    remove_meta_box( 'dashboard_primary', 'dashboard', 'side' );
    remove_meta_box( 'dashboard_site_health', 'dashboard', 'normal' );
    remove_action( 'welcome_panel', 'wp_welcome_panel' );

    // Register our agency support widget
    wp_add_dashboard_widget(
        'wppoland_support_widget',
        'Agency Support & Diagnostics',
        __NAMESPACE__ . '\\render_support_dashboard_widget'
    );
}
add_action( 'wp_dashboard_setup', __NAMESPACE__ . '\\rebuild_dashboard_widgets' );

/**
 * Renders support contact info and server telemetry.
 */
function render_support_dashboard_widget(): void {
    $published_pages = wp_count_posts( 'page' )->publish;
    $php_version     = phpversion();
    $wp_version      = get_bloginfo( 'version' );

    ?>
    <div class="wppoland-dashboard-widget">
        <h4>Technical Diagnostics</h4>
        <ul>
            <li><strong>WordPress Version:</strong> <?php echo esc_html( $wp_version ); ?></li>
            <li><strong>PHP Environment:</strong> <?php echo esc_html( $php_version ); ?></li>
            <li><strong>Active Pages:</strong> <?php echo esc_html( (string) $published_pages ); ?></li>
        </ul>
        <hr />
        <h4>Need Technical Support?</h4>
        <p>If you require layout modifications, custom features, or database updates, reach out to our team:</p>
        <p>
            <a href="mailto:support@wppoland.com" class="button button-primary">Email Support</a>
            <a href="https://wppoland.com/en/contact/" target="_blank" rel="noopener" class="button">Open Ticket</a>
        </p>
    </div>
    <?php
}4. Customizing the WordPress Settings API
To allow clients to configure specific site properties (like social links or support phone numbers) without giving them access to general WordPress options, build a custom settings page using the Settings API.
declare(strict_types=1);

namespace WPPoland\Admin\BrandingSettings;

/**
 * Registers custom settings, sections, and fields.
 */
class AgencySettingsPage {

    public function __construct() {
        add_action( 'admin_menu', [ $this, 'add_branding_settings_menu' ] );
        add_action( 'admin_init', [ $this, 'register_agency_branding_settings' ] );
        add_action( 'admin_notices', [ $this, 'render_settings_validation_banners' ] );
    }

    public function add_branding_settings_menu(): void {
        add_options_page(
            'Agency Configurations',
            'Agency Branding',
            'manage_options',
            'agency-branding-settings',
            [ $this, 'render_branding_settings_page' ]
        );
    }

    public function register_agency_branding_settings(): void {
        register_setting(
            'agency_branding_group',
            'agency_support_phone',
            [
                'type'              => 'string',
                'sanitize_callback' => [ $this, 'validate_support_phone_number' ],
                'default'           => ''
            ]
        );

        add_settings_section(
            'agency_contact_section',
            'Client Portal Support Info',
            [ $this, 'render_section_description' ],
            'agency-branding-settings'
        );

        add_settings_field(
            'agency_support_phone_field',
            'Support Hotline Number',
            [ $this, 'render_phone_input_field' ],
            'agency-branding-settings',
            'agency_contact_section'
        );
    }

    public function validate_support_phone_number( $value ): string {
        $clean = sanitize_text_field( $value );
        // Enforce basic validation: numbers, space, and +
        if ( ! empty( $clean ) && ! preg_match( '/^\+?[0-9\s\-]+$/', $clean ) ) {
            add_settings_error(
                'agency_support_phone',
                'invalid_phone_format',
                'The phone number format is invalid. Please use numeric characters, spaces, and hyphens.',
                'error'
            );
            return (string) get_option( 'agency_support_phone', '' ); // Return old value
        }
        return $clean;
    }

    public function render_settings_validation_banners(): void {
        settings_errors( 'agency_branding_group' );
    }

    public function render_section_description(): void {
        echo '<p>Configure contact information displayed to users across the dashboard.</p>';
    }

    public function render_phone_input_field(): void {
        $value = get_option( 'agency_support_phone', '' );
        printf(
            '<input type="text" name="agency_support_phone" value="%s" class="regular-text" />',
            esc_attr( (string) $value )
        );
    }

    public function render_branding_settings_page(): void {
        if ( ! current_user_can( 'manage_options' ) ) {
            return;
        }
        ?>
        <div class="wrap">
            <h1>Agency Settings Configuration</h1>
            <form action="options.php" method="post">
                <?php
                settings_fields( 'agency_branding_group' );
                do_settings_sections( 'agency-branding-settings' );
                submit_button( 'Save Configurations' );
                ?>
            </form>
        </div>
        <?php
    }
}

new AgencySettingsPage();5. White-Labeling the Administration Toolbar
The admin bar at the top of the viewport displays generic WordPress links. Customizing this space removes these links and highlights useful options like quick cache purging.
Customizing Toolbar Nodes
declare(strict_types=1);

namespace WPPoland\Admin\Toolbar;

/**
 * Customizes elements in the global admin toolbar.
 */
function customize_admin_toolbar( \WP_Admin_Bar $wp_admin_bar ): void {
    // Remove the default WordPress logo and updates dropdowns
    $wp_admin_bar->remove_node( 'wp-logo' );
    $wp_admin_bar->remove_node( 'updates' );
    $wp_admin_bar->remove_node( 'comments' );

    // Add a custom fast shortcut for clearing database transients
    $wp_admin_bar->add_node( [
        'id'    => 'purge-transients',
        'title' => 'Purge Database Cache',
        'href'  => wp_nonce_url( admin_url( 'admin-post.php?action=purge_transients' ), 'purge_transients_nonce' ),
        'meta'  => [ 'class' => 'wppoland-toolbar-action' ]
    ] );
}
add_action( 'admin_bar_menu', __NAMESPACE__ . '\\customize_admin_toolbar', 999 );6. Styling the Admin Panel with Custom CSS
Apply custom CSS layout styles to the WordPress admin panel using native admin_head filter hooks to create a consistent, modern white-label developer experience for clients.
Overriding Default Administration Colors and Styling Gutenberg
Standard WordPress admin interfaces use a dark grey sidebar palette. To change this to match your client’s agency branding, you can inject a custom stylesheet block directly into the admin viewport:
- Targeting Core Layout Selectors: Override identifiers like
#wpadminbarand#adminmenuto apply brand colors. - Modern Styling Properties: Use CSS variables and custom flexbox layouts to adjust column margins and clean up button borders.
- Block Editor Layout Integration: Use the
enqueue_block_editor_assetshook to enqueue a stylesheet specifically for the Gutenberg editor view. This ensures custom formatting, page widths, and typography styles match the frontend layout.
Here is the custom PHP stylesheet injector implementation:
Injecting CSS Styles
declare(strict_types=1);

namespace WPPoland\Admin\Styles;

/**
 * Injects custom CSS stylesheets to brand the admin panel.
 */
function inject_custom_admin_branding_css(): void {
    ?>
    <style>
        #wpadminbar {
            background: #1e1e2f !important;
            border-bottom: 2px solid #5a5ae5;
        }
        #adminmenu, #adminmenuback, #adminmenuwrap {
            background-color: #11111a !important;
        }
        #adminmenu .wp-has-current-submenu .wp-submenu .wp-submenu-head,
        #adminmenu .wp-menu-arrow div {
            background-color: #5a5ae5 !important;
        }
        .wp-core-ui .button-primary {
            background: #5a5ae5 !important;
            border-color: #5a5ae5 !important;
            box-shadow: none !important;
            text-shadow: none !important;
        }
    </style>
    <?php
}
add_action( 'admin_head', __NAMESPACE__ . '\\inject_custom_admin_branding_css' );7. Customizing the Login Page Template and Authentication Filters
The login screen is the primary entry point to your admin panel. Customizing this page with custom CSS and redirects helps maintain a cohesive, branded experience.
declare(strict_types=1);

namespace WPPoland\Admin\Login;

/**
 * Enqueues custom CSS styles for the login page.
 */
function customize_login_screen_styles(): void {
    ?>
    <style>
        body.login {
            background-color: #f3f4f6 !important;
        }
        body.login h1 a {
            background-image: url('https://wppoland.com/images/logo.png') !important;
            background-size: contain !important;
            width: 320px !important;
            height: 80px !important;
        }
        body.login #loginform {
            border-radius: 8px !important;
            box-shadow: 0 4px 6px -1px rgba(0, 0, 0, 0.1) !important;
        }
    </style>
    <?php
}
add_action( 'login_enqueue_scripts', __NAMESPACE__ . '\\customize_login_screen_styles' );

/**
 * Changes the default logo link URL target from WordPress.org to our client agency home.
 */
function customize_login_logo_url(): string {
    return home_url();
}
add_filter( 'login_headerurl', __NAMESPACE__ . '\\customize_login_logo_url' );

/**
 * Intercepts the authentication pipeline to log failed attempts and block brute-force patterns.
 */
function monitor_login_attempts( $user, string $username, string $password ) {
    if ( is_wp_error( $user ) && ! empty( $username ) ) {
        // Log the failure to the error log for analysis by security triggers
        error_log( sprintf(
            'WPPoland Security: Failed login attempt detected for user "%s" from IP %s',
            sanitize_text_field( $username ),
            sanitize_text_field( $_SERVER['REMOTE_ADDR'] ?? 'UNKNOWN' )
        ) );
    }
    return $user;
}
add_filter( 'authenticate', __NAMESPACE__ . '\\monitor_login_attempts', 30, 3 );8. Action Plan: A 90-Day Admin Customization Roadmap
Follow this timeline to optimize, brand, and secure your site’s administration area:
- Days 1–30 (Access Control & Security): Register custom client manager roles with minimal capabilities to prevent modifications to core settings. Add menu filter hooks in
functions.phpto hide unused options from non-administrative users. Configuremap_meta_capfilter hooks to protect key layout pages (such as the homepage or contact page) from being deleted or modified by restricted editor roles. - Days 31–60 (Telemetry & Branding Page): Build custom dashboard widgets using diagnostic data hooks to display server telemetry and support links on the login screen. Utilize the WordPress Settings API to implement a dedicated configurations section, complete with custom input validation rules and validation error banners. Customize toolbar options by registering shortcuts and clearing transients.
- Days 61–90 (Visual Styling & Authentication): Inject custom stylesheets via the
admin_headhook to match your brand style layout. Customize the login template screen with custom logo dimensions and redirect hooks, and register authentication filters to log failed attempts and block automated brute-force scans. Run automated test runs to verify admin loading stability.
Need help building a custom, white-label admin experience or securing user access controls? Our WordPress development team can audit user roles, build custom settings pages, and optimize your dashboard layout. Contact us to discuss your project requirements.